Prep Time: 15-20 minutes
Cook Time: 20-25 minutes
Click Here to jump to the recipe.
Click Here to view a video tutorial.
I absolutely love tacos, and anything cooked with taco seasoning. I love eating taco salads because they offer the complete taco experience with a more controlled amount of tortilla. Between flour and corn, corn tortillas are my favorite. As much as I love a corn tortilla taco, I try to minimize the carbs where I can. This was part of the inspiration for this recipe. Within my household and to my friends, “Bee’s chicken pockets” are my creative and signature niche, much like with my soups, sauces, and marinades. What is a chicken pocket? This is the name I have given to my stuffed ground chicken recipes: Bee’s Signature Chicken Pockets. This is my Taco Melt (with cream cheese) Cheddar Crusted Chicken Pockets recipe.
Recipe Origin
I love stuffed chicken and stuffed chicken breasts. I have always tried to find easy and convenient ways to stuff whole chicken breasts. I’ll admit it; I find stuffing whole chicken breasts to be a challenge. Even when I do get it close to perfect, the stuffing isn’t enough compared to the amount of chicken breast. After expressing this frustration to my mom, she asked if I would consider using ground chicken instead. I immediately laughed at myself for not thinking of that sooner; what a brilliant idea!
The idea for this particular direction and filling came from simply viewing what I had to work with. I had just recently cooked my Chicken Taco Stuffed Peppers and had been wondering what to do with my cream cheese. Slowly but surely, this recipe came to be. I tried it a couple of times before perfecting the amount of seasoning and adding the crusted cheddar layer. I also played around with different cooking methods.
Cooking Methods
Although I prefer to pan or air fry, you can also grill, or oven bake these chicken pockets. I recommend using parchment paper when grilling or cooking on any rack with grooves or holes. Ground chicken is a lot slimier and softer than other ground meats. If you intend to bake them in the oven, you will need to increase your cooking time by 10-15 more minutes. Yes, you can also deep fry these.
Alterations and substitutions
Like most recipes, this one is very tweakable. You can add or subtract whatever you want. Consider adding scallions, cilantro, or hot sauce. If you don’t like a certain ingredient, just leave it out. For the filling, consider replacing the cream cheese with Velveeta or natural sharp cheddar. Add corn and beans to kick things up a notch and add more flavor. If you’re not a cheese eater, consider other crust options, or smother the outer layer of the chicken pocket with salsa before cooking.
You also don’t need ground chicken to enjoy this recipe. If you only have ground beef, pork, or turkey, use that as your pocket shell instead. I only prefer ground chicken because of my dietary needs. Keep in mind that ground beef tends to be crumblier. You may want to add a binder to avoid the meat crumbling apart in your hand (if you plan to hold it).
Ways to Enjoy
These chicken pockets pack a huge punch of flavor between the filling and cheddar cheese crust. There are also some MUST HAVE toppings that pair perfectly with these chicken pockets. My favorite dip/topping/garnish is salsa. Whether it is homemade or my favorite brand, salsa is my absolute favorite dip and topping. Another way to enjoy these chicken pockets is with nacho cheese, guacamole, sour cream, and/or taco sauce. I like to eat these alongside one of my taco stuffed peppers. Other ways I like to eat and serve these are with rice, with sweet plantain, or alone as a snack or appetizer.
Make it a Meal Prep Day
Another thing I LOVE about these is the fact that you can cook, cool, then FREEZE them. In my household, meal prepping is a savior! It’s great for busy days and when you’re under the weather, but the family needs to eat. If you will be storing them for longer than a couple of days, package your fully cooked chicken pockets into a sealable and freezer safe bag or container. When you’re ready to eat or serve, reheat in the oven, microwave, or air fryer. This also makes great easy meals that the kids can plop into the microwave from the freezer.
Ingredients


- Ground chicken (I use around 1.5 lbs. for 4-5 servings)
- 8 oz cream cheese
- 1/2 cup chopped/diced onion
- 1/2 cup chopped/diced bell pepper
- 1/2 cup chopped/diced tomato
- 1 heaping TBSP ground cumin
- 2 tsp chili powder
- 2 tsp paprika
- 1 tsp black pepper
- 1 tsp ground mustard
- 2 tsp garlic powder
- 2 tsp onion powder
- Kosher salt to taste (I used a heaping teaspoon)
- Olive oil, or cooking oil of choice
- Salsa for topping or dip
- Optional – crushed red pepper
- Optional – a dash of fresh lemon juice (on the peppers and onions while cooking)
Instructions
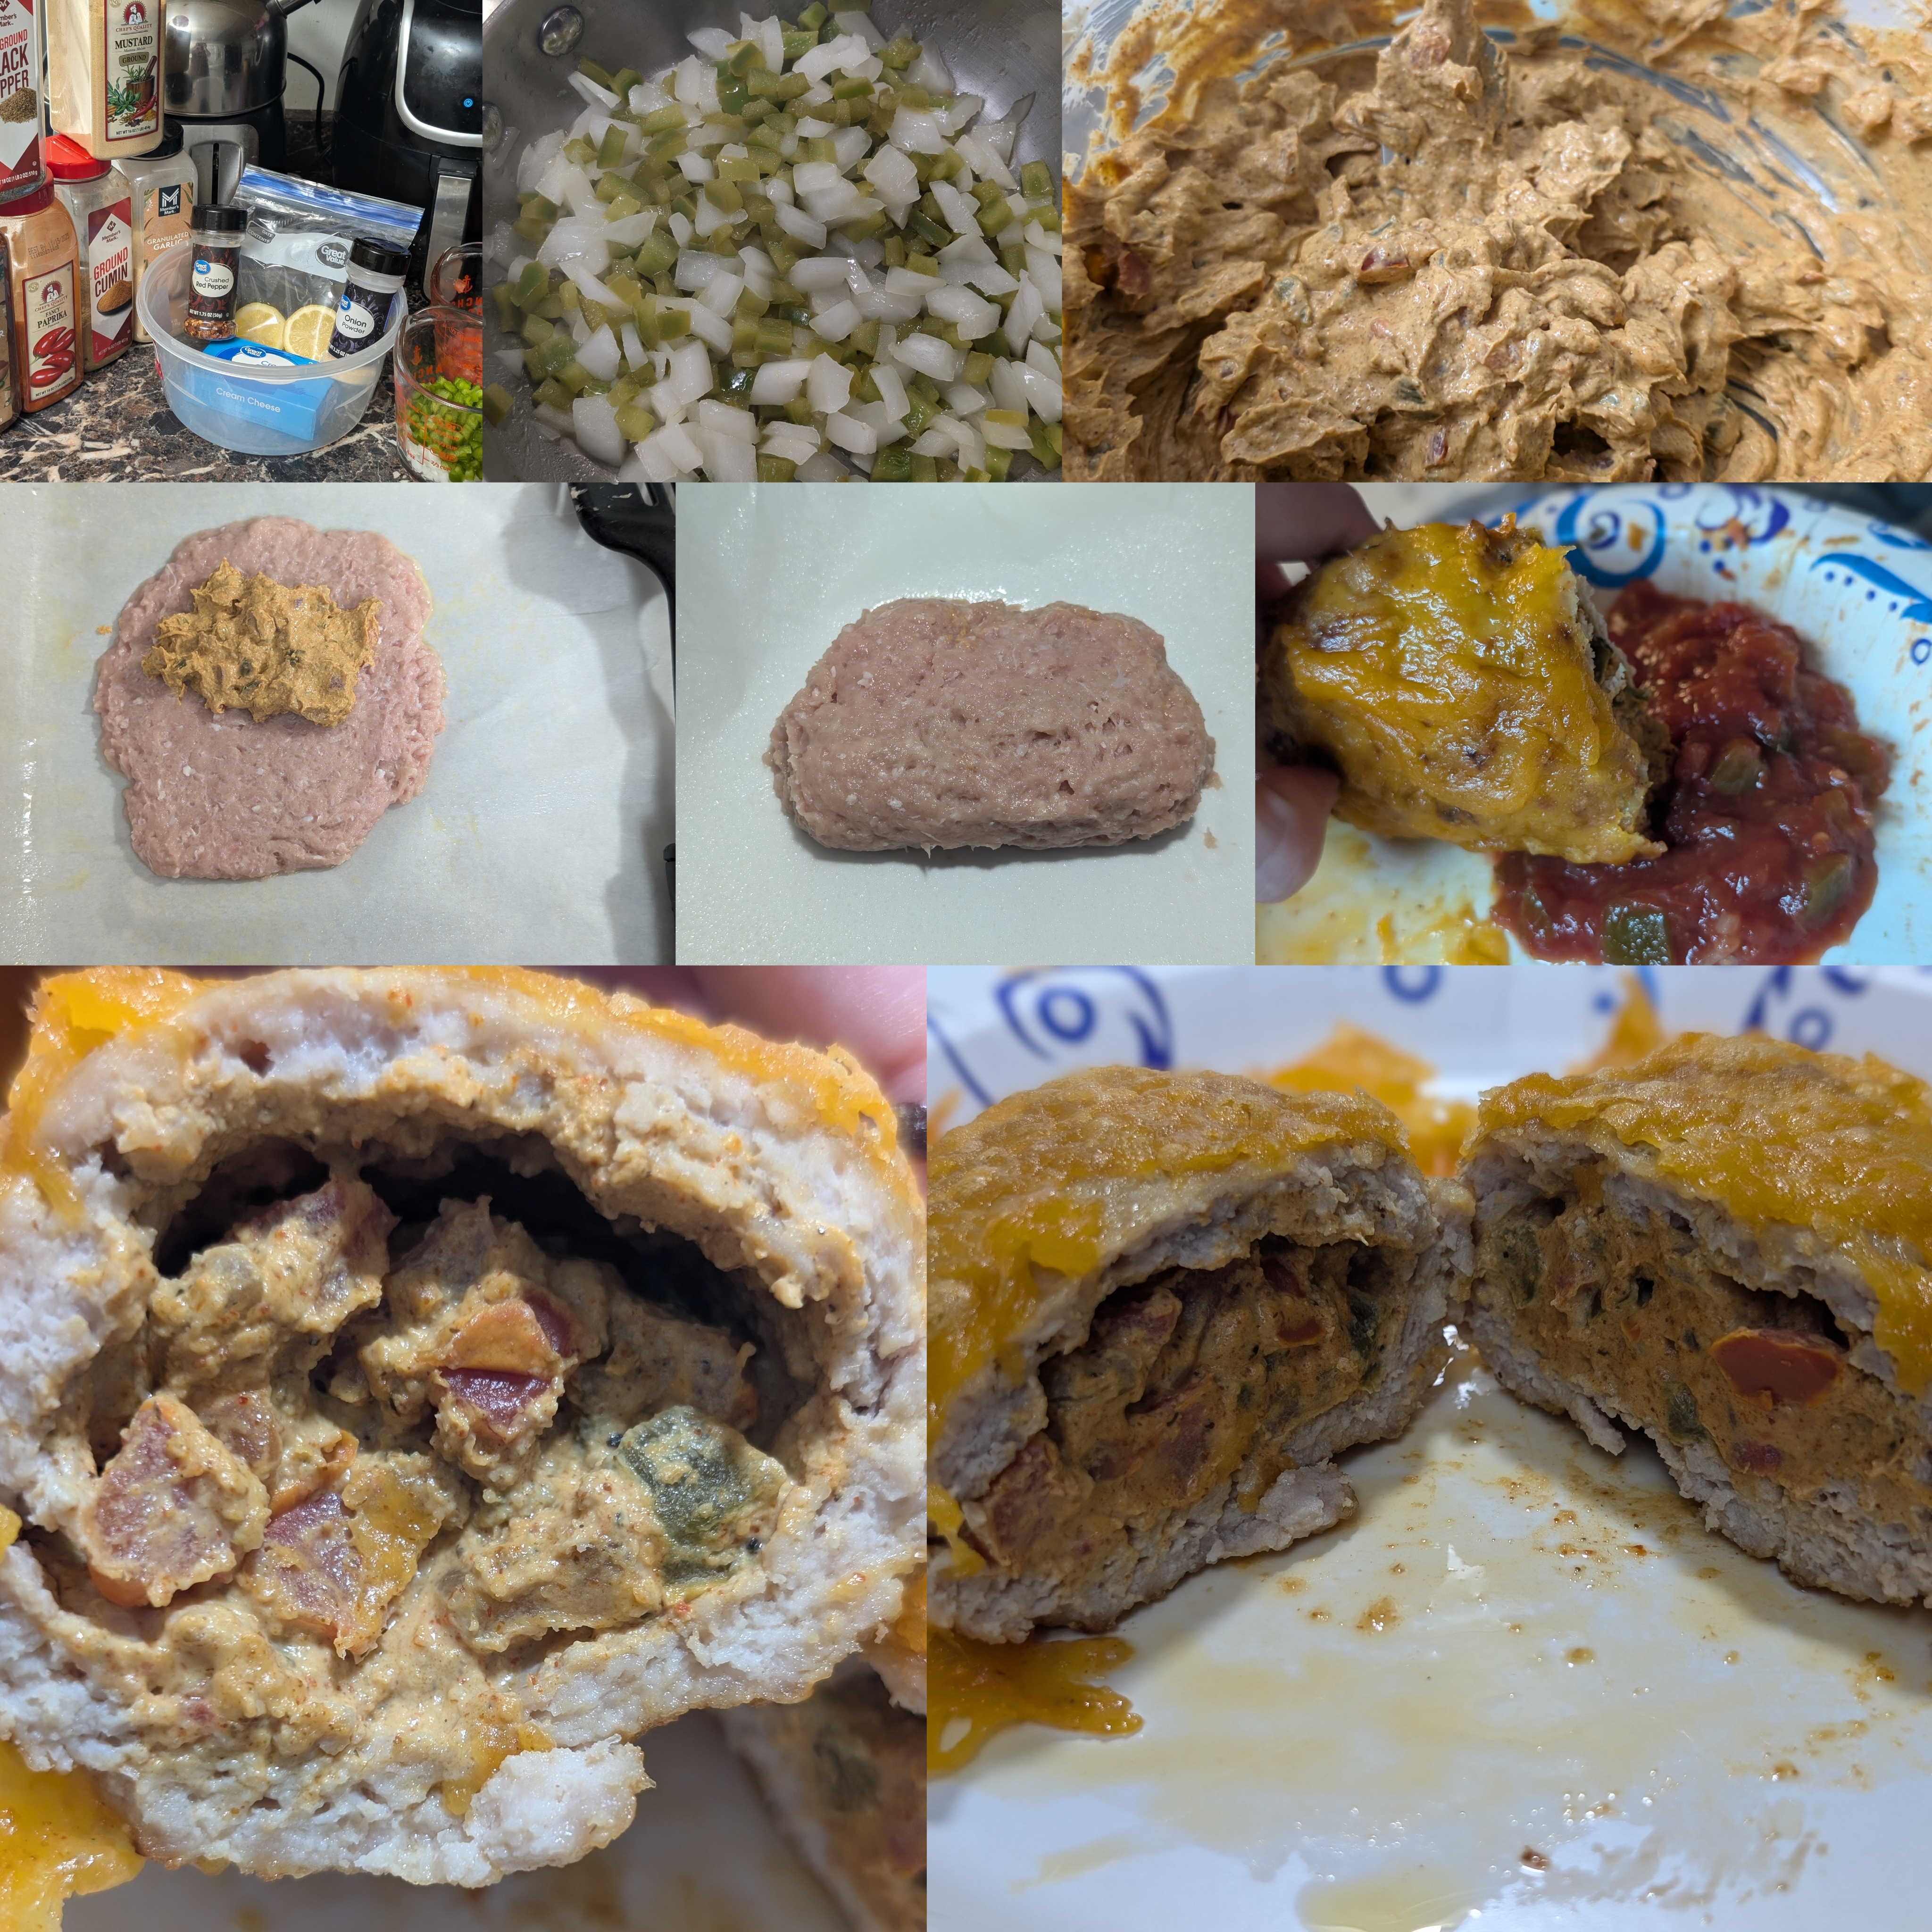
First, prep your taco seasoning pack by combining all the dry seasonings (salt, pepper, paprika, chili powder, ground mustard, ground cumin, garlic powder, onion powder, optional crushed red pepper) together in a small bowl, bag or container.
In a small to medium skillet, add a dash of olive oil, as well as the diced onion and pepper, over medium heat.
Squeeze an even shower of lemon juice over the onions and peppers.
Using a sieve helps to filter out seeds and pulp.
Cook while stirring the veggies around occasionally for 7-10 minutes, or until the veggies are tender (lightly browned or caramelized if you like).


Now, in a medium to large mixing bowl, combine the dry seasoning pack, cream cheese, fresh diced tomato, and cooked onion and pepper.
Stir well and mix everything evenly.

On top of some parchment paper (I also spray a light layer of oil), flatten out a decent amount of the ground chicken into a circular shape.
I like to think of the size of a small taco tortilla.
Add as much or as little of your filling as you’d like. I STUFF mine. Leave enough room to fold the chicken over and seal it.
Fold the chicken over itself and the added filling. Seal everything shut.
Remember to add a vent hole (to avoid any potential eruption or explosion). I use a toothpick to add a hole through the top.


Now, air or pan fry your chicken for 10-12 minutes on each side (air fry at 375 degrees).
For the outer cheese crust, you can oven broil or air fry it on.
For air frying the cheese crust, coat cheese on one side and cook for 3 minutes. Flip over and repeat.
For oven broiling the cheese crust, coat cheese on one side and broil on high for 3 minutes. Flip over and repeat.
That’s it; it’s that simple. Don’t let the simplicity fool you; IT IS DELICIOUS!


Questions or comments? Let’s Talk!
All topics and questions will be addressed by me.
ENTER DISCUSSION FORUM HERE.